Different Types of Utensils Used in BARs and Lobby Lounges
Bars and lobby lounges are places where people usually gather to relax and socialize. These places usually serve drinks and light snacks, which require different types of utensils for serving and consumption. Some of the most common types of utensils used in bars and lobby lounges include glasses, shakers, strainers, jiggers, and stirrers.
Glasses come in different shapes and sizes, depending on the type of drink being served. For example, martini glasses are typically used for cocktails, while beer mugs are used for beer. Shakers and strainers are used for making cocktails. Shakers are used to combine ingredients, while strainers are used to strain out ice and other solids.
Jiggers are small measuring cups used to measure the amount of alcohol in a drink. This is important in making cocktails, as the right amount of alcohol can make or break a drink. Stirrers are used to mix drinks, and can be made of glass, metal, or plastic.
In addition to these utensils, bars and lobby lounges may also use other tools such as bottle openers, ice scoops, and cork screws. These tools help to make the process of serving drinks more efficient and professional.
Overall, the type of utensils used in a bar or lobby lounge depend on the type of drinks being served and the establishment’s preferences. However, having the right utensils is essential for creating a great customer experience and serving drinks in a professional manner.
List Of Bar Utensils and Equipment’s
1. Bar Floor Mat
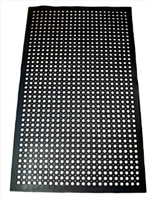
A bar floor mat is a rubber or cushioned mat designed to be placed on the floor behind a bar counter. It serves several purposes in a bar or restaurant setting:
- Spillage Absorption: One of the primary functions of a bar floor mat is to absorb spills and drips that may occur during the preparation of drinks. It helps keep the floor dry and prevents slips and falls.
- Comfort for Bartenders: Bartenders often stand for long periods, and the cushioning provided by bar floor mats helps reduce fatigue and discomfort. The anti-fatigue properties of these mats can make it more comfortable for bartenders who spend extended hours on their feet.
- Glassware Protection: The rubber surface of the mat provides a soft landing for glassware, reducing the risk of breakage when glasses are placed on the bar counter. It also prevents glassware from sliding around.
- Easy Cleanup: Bar floor mats are designed to be easy to clean. They can be quickly wiped down or hosed off to remove spilled liquids and debris.
- Non-Slip Surface: The rubber material often has anti-slip properties, enhancing safety in a busy and fast-paced environment where spills are common.
- Aesthetics: Beyond functionality, bar floor mats can contribute to the overall aesthetics of the bar area. They come in various sizes, shapes, and colors to complement the bar’s decor.
When selecting a bar floor mat, consider factors such as size, thickness, and durability based on the specific needs and layout of the bar. Proper maintenance, including regular cleaning, is essential to ensure the mats remain effective and hygienic.
2. Bar Work Table Rubber or Plastic Mat
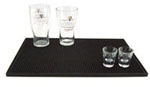
When choosing a mat for a bar work table, both rubber and plastic mats have their advantages, and the choice depends on various factors including your specific needs and preferences. Here’s a comparison of the two materials:
Rubber Mats:
- Durability: Rubber mats are generally more durable and long-lasting than plastic mats. They can withstand heavy use, resist wear and tear, and are less likely to crack or break.
- Anti-Fatigue Properties: Rubber mats often have anti-fatigue properties, providing a comfortable surface for standing for extended periods. This can be beneficial for bartenders or staff who spend long hours working behind the bar.
- Slip Resistance: Rubber is naturally slip-resistant, providing a safer working environment, especially in areas prone to spills.
- Cushioning: Rubber mats offer better cushioning, making them more forgiving for fragile items or glassware that may be placed on the work table.
- Ease of Cleaning: Rubber mats are generally easy to clean. They can be wiped down or hosed off, and their non-porous surface is resistant to absorbing liquids.
Plastic Mats:
- Lightweight: Plastic mats are often lighter than rubber mats, making them easier to move or reposition as needed.
- Chemical Resistance: Some plastic mats are resistant to certain chemicals, which can be beneficial in environments where exposure to liquids or cleaning agents is common.
- Variety of Colors: Plastic mats come in a variety of colors, allowing you to choose a mat that complements the aesthetics of your bar.
- Affordability: Plastic mats tend to be more affordable than high-quality rubber mats, making them a cost-effective option.
- Ease of Storage: Plastic mats can be rolled up or easily stacked for storage when not in use.
Ultimately, the choice between rubber and plastic depends on your priorities. If durability, slip resistance, and comfort are top priorities, rubber may be the better choice. If you’re looking for a more lightweight and cost-effective option with a variety of color choices, plastic mats might be suitable. Consider the specific needs of your bar environment and the tasks performed on the work table when making your decision.
3. Bar Caddies
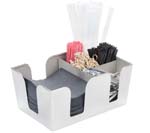
Bar caddies are organizational tools commonly used in bars and restaurants to keep essential items within easy reach for bartenders. These caddies help maintain an organized and efficient workspace, allowing bartenders to quickly access the tools and supplies they need. Here are some common features and items you might find in a typical bar caddy:
- Compartments: Bar caddies often have multiple compartments or sections designed to hold specific items. These compartments help organize various tools and make it easy for bartenders to locate what they need quickly.
- Napkin Holder: Many bar caddies include a designated space for napkins. This can be a simple slot or a built-in dispenser to keep napkins readily available for drink preparation and service.
- Straw Holder: A section for holding straws is a common feature in bar caddies. It helps keep straws organized and easily accessible for garnishing drinks.
- Toothpick and Swizzle Stick Holder: Some caddies have compartments specifically designed for toothpicks or swizzle sticks, providing a convenient place to store these items for use in cocktails.
- Condiment Compartments: Bar caddies often include compartments for holding commonly used condiments such as citrus slices, cherries, olives, or any other garnishes relevant to the bar’s offerings.
- Space for Stirrers: A designated area for stirrers or mixing sticks is common in bar caddies. This ensures that bartenders can easily reach for these tools when preparing drinks.
- Small Tool Storage: Some caddies may have sections for storing small bar tools like jiggers, bottle openers, muddlers, or other utensils used in drink preparation.
- Material: Bar caddies are typically made from materials like plastic, acrylic, stainless steel, or other durable materials. These materials are easy to clean and withstand the demands of a busy bar environment.
- Size and Design: Bar caddies come in various sizes and designs to fit different bar layouts. Some are designed to sit on the bar counter, while others may be wall-mounted or attached to the bar itself.
Bar caddies play a crucial role in maintaining order and efficiency behind the bar, ensuring that bartenders have everything they need at their fingertips to provide excellent service to customers.
4. Bar Condiment Caddies
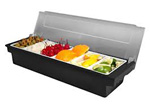
Bar condiment caddies are organizers specifically designed to hold and display various condiments and garnishes used in the preparation of drinks. These caddies are a practical addition to the bar setup, providing a convenient and organized way to store and present condiments for bartenders. Here are common features and items you might find in bar condiment caddies:
- Compartments: Condiment caddies typically have multiple compartments or sections to separate different condiments. This helps in organizing items and allows bartenders to quickly locate what they need.
- Lids or Covers: Some caddies come with lids or covers to protect condiments from contaminants, such as dust or airborne particles. This is especially important for items like citrus wedges or cherries.
- Adjustable Dividers: Certain caddies have adjustable dividers, allowing bartenders to customize the size of each compartment based on the types and quantities of condiments they need to store.
- Material: Bar condiment caddies are commonly made of materials such as plastic, acrylic, or stainless steel. These materials are durable, easy to clean, and can withstand the conditions of a bar environment.
- Size and Configuration: Condiment caddies come in various sizes and configurations to accommodate different condiments and fit the available space on the bar counter. Some may be designed as tray-style caddies, while others may have a tiered or stacked layout.
- Napkin Holder: Some condiment caddies include a built-in napkin holder or dispenser for convenient access to napkins, which are often used in conjunction with condiments during drink preparation.
- Branding Opportunities: Certain condiment caddies can be customized with the bar’s logo or branding, adding a personalized touch to the bar area.
- Easy to Clean: The materials used in condiment caddies are typically easy to clean, making it simple for staff to maintain hygiene in the bar area.
Common condiments found in these caddies include:
- Citrus slices (lemon, lime, orange)
- Olives
- Cherries
- Pickles
- Sugar cubes
- Salt
- Pepper
Bar condiment caddies contribute to the efficiency of bartenders by keeping essential ingredients organized and easily accessible, ultimately enhancing the speed and quality of drink preparation.
5. LiqueurLiqueur - Sweet spirits made with re-distilled fruits or extracts. Speed Rail
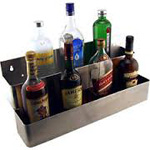
A liqueur speed rail, also known as a speed rack or speed rail, is a bar accessory designed to hold and organize bottles of liqueurs and other commonly used spirits. It is mounted on the back bar or under the counter, providing bartenders with quick and easy access to the various liqueurs they need when preparing drinks. Here are some key features and aspects of liqueur speed rails:
- Mounting: Liqueur speed rails are typically mounted horizontally on the back bar or under the counter. They can be secured to the bar structure, making the bottles easily accessible to the bartender.
- Number of Tiers: Speed rails often come in single-tier or double-tier configurations. A single-tier speed rail holds bottles in a single row, while a double-tier speed rail has two rows, allowing for more bottles to be stored in the same space.
- Material: Speed rails are commonly made of durable materials such as stainless steel. This material is sturdy, corrosion-resistant, and easy to clean, making it suitable for the demands of a busy bar environment.
- Size: The size of a liqueur speed rail can vary, and the choice often depends on the available space on the back bar and the number of bottles you want to store. Standard sizes typically accommodate several bottles in a row.
- Bottle Capacity: The number of bottles a speed rail can accommodate depends on its size and configuration. Larger bars or bars with an extensive drink menu may opt for longer or double-tier speed rails to hold more bottles.
- Accessibility: The primary purpose of a speed rail is to provide quick and easy access to frequently used bottles. This helps bartenders work efficiently, reducing the time it takes to retrieve ingredients during drink preparation.
- Branding Opportunities: Some speed rails may have customizable features or areas where the bar’s logo or branding can be added, contributing to the overall aesthetics of the bar setup.
- Versatility: While commonly used for liqueurs, speed rails can also hold other spirits, such as vodka, rum, or whiskey, depending on the bartender’s preferences and the drink menu.
Overall, a liqueur speed rail is a practical tool that enhances the organization and efficiency of a bar by keeping essential bottles readily available for bartenders. It plays a crucial role in streamlining the drink preparation process in a fast-paced bar environment.
6. Bottle Opener
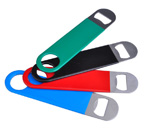
A bottle opener is a simple yet essential tool designed for removing the metal caps or lids from bottles. It is a common tool found in bars, kitchens, and households. There are various types of bottle openers, each with its own design and method of operation. Here are some common types:
- Flat-Top Bottle Opener:
- Also known as a “church key” or “bar blade.”
- It has a flat, elongated shape with a straight edge on one side and a curved lip on the other.
- To use, the straight edge is placed under the cap, and the opener is leveraged upward to lift off the cap.
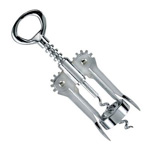
- Winged Corkscrew Bottle Opener:
- Features a central screw that is twisted into the cork.
- Two hinged wings on either side are lifted, pulling the cork out as the screw is turned.
- Primarily used for wine bottles but can also work for certain types of beer bottles.
- Waiter’s Corkscrew:
- Compact and versatile, commonly used by waiters and sommeliers.
- Includes a small knife for cutting foil, a screw for removing corks, and a hinged lever for leverage in pulling out corks.
- Wall-Mounted Bottle Opener:
- Mounted on a wall or other surface.
- Often found in bars or at home near a designated beverage area.
- Bottles are opened by placing the bottle cap under the opener and pushing down.
- Pop Top or Ring-Pull Opener:
- Specifically designed for opening cans with pull tabs.
- Slides under the tab and lifts it to open the can.
- Magnetic Bottle Opener:
- Equipped with a magnet to catch and hold the removed bottle caps.
- Reduces litter and provides a convenient way to collect caps.
- Automatic or Electric Bottle Opener:
- Powered by batteries or electricity.
- Automatically removes the cap with the push of a button.
When choosing a bottle opener, consider factors such as ease of use, durability, and the types of bottles you’ll be opening. Many people prefer to have a reliable bottle opener on hand for various beverages, whether it’s for beer, soda, or other bottled drinks.
7. Wine Opener
A wine opener, also known as a corkscrew, is a tool specifically designed for removing corks from wine bottles. There are several types of wine openers, each with its own design and method of operation. Here are some common types:
- Waiter’s Corkscrew:
- Also known as a “wine key” or “sommelier knife.”
- Compact and versatile, often used by waiters and wine professionals.
- Typically includes a small knife for cutting foil, a screw for removing corks, and a hinged lever for leverage in pulling out corks.
- Winged Corkscrew:
- Features a central screw that is twisted into the cork.
- Two hinged wings on either side are lifted, pulling the cork out as the screw is turned.
- The wings give extra leverage and make it easier to extract the cork.
- Lever Corkscrew:
- Also known as a “rabbit” or “lever arm” corkscrew.
- It has a lever mechanism that makes cork removal easier with a simple up-and-down motion.
- Electric Wine Opener:
- Powered by batteries or electricity.
- Operates with the push of a button, making it an easy and convenient option for those who may have difficulty using manual openers.
- Ah-So Corkscrew:
- Also called a “two-pronged” or “butler’s friend” corkscrew.
- Consists of two thin metal prongs that are inserted on either side of the cork and twisted to remove it without damaging the cork.
- Pump Air Pressure Corkscrew:
- Uses air pressure to push the cork out of the bottle.
- Typically includes a needle that is inserted into the cork, and then air is pumped to release the cork from the bottle.
- Screwpull or Tabletop Corkscrew:
- Secured to a tabletop or countertop.
- Operated by turning a handle to insert the screw into the cork and then lifting the handle to extract the cork.
When choosing a wine opener, consider factors such as ease of use, the type of cork it can handle, and personal preference. Some wine enthusiasts may have multiple types of openers for different occasions or wine varieties. It’s also essential to handle wine bottles with care to prevent damage to the cork and ensure the wine’s quality.
8. Champagne Bottle Stopper
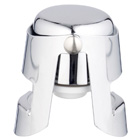
A Champagne bottle stopper is a device used to reseal and preserve the carbonation in an opened bottle of Champagne or sparkling wine. Unlike traditional wine bottle stoppers, Champagne stoppers are designed to accommodate the unique pressure and characteristics of sparkling wines. Here are some common features and types of Champagne bottle stoppers:
- Mushroom Cork Stoppers:
- These stoppers have a mushroom-shaped design that fits securely into the neck of a Champagne bottle.
- The top part resembles a cap, and the wider base provides a snug fit to maintain the pressure inside the bottle.
- Spring-Loaded Stoppers:
- Equipped with a spring-loaded mechanism that expands to create a tight seal in the bottle’s neck.
- The spring action helps keep the stopper securely in place, preventing the escape of carbonation.
- Clamp Stoppers:
- Feature a clamp or hinged mechanism that tightens around the bottle neck to create a seal.
- Some designs have a lever or clamp that can be pressed down to secure the stopper in place.
- Rubber or Silicone Seal Stoppers:
- Utilize a rubber or silicone seal to create an airtight closure.
- These stoppers are often adjustable to fit a variety of bottle sizes and shapes.
- Screw Cap Stoppers:
- Have a threaded design that screws onto the bottle’s neck.
- The threaded closure provides a secure and airtight seal.
- Champagne Pump Stoppers:
- CombineCombine: To mix two ingredients thoroughly. a stopper with a pump mechanism.
- The pump removes excess air from the bottle to help preserve the wine’s effervescence.
When selecting a Champagne bottle stopper, it’s essential to ensure that it is specifically designed for sparkling wines. Champagne stoppers are effective in maintaining carbonation and preventing the loss of effervescence, which is crucial for preserving the unique characteristics of Champagne and other sparkling wines. Additionally, Champagne stoppers are reusable, making them a practical accessory for those who enjoy Champagne over multiple sittings.
9. Wine Bottle Stopper
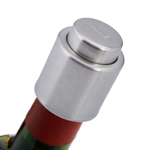
A wine bottle stopper is a device used to seal an opened bottle of wine, preserving its flavors and preventing oxidation. Wine stoppers come in various designs and materials, and they are typically reusable. Here are some common types of wine bottle stoppers:
- Cork Stopper:
- Traditional wine stoppers are made of cork, the same material used in many wine bottle closures.
- Cork stoppers are effective for short-term storage and can be easily inserted into the neck of the bottle.
- Vacuum Pump Stopper:
- Consists of a rubber stopper with a built-in pump.
- After inserting the stopper into the bottle, the user pumps out the air, creating a vacuum seal that helps slow down oxidation.
- Silicone Stopper:
- Made of flexible silicone material, these stoppers create a snug and airtight seal.
- Silicone stoppers are often adjustable to fit various bottle sizes and shapes.
- Expandable Rubber Stopper:
- Features a rubber or plastic stopper with an expanding design.
- When inserted into the bottle, the stopper expands to create a tight seal.
- Screw Cap Stopper:
- Resembles the screw caps commonly used in wine bottles.
- Screw cap stoppers can be twisted onto the bottle’s neck to create a secure seal.
- Decorative and Novelty Stoppers:
- Come in various creative and decorative designs.
- While these stoppers add a touch of style, they may not always provide an airtight seal for long-term storage.
- Glass or Metal Stopper:
- Made of glass, metal, or a combination of both materials.
- These stoppers are often stylish and can be visually appealing.
When choosing a wine bottle stopper, consider the type of wine you are sealing, how long you intend to store the wine and your preferences regarding ease of use and aesthetics. For short-term storage (a few days to a week), most types of stoppers can be effective. However, for longer-term storage, vacuum pump stoppers are often recommended as they help remove excess air, minimizing oxidation and preserving the wine’s quality. Additionally, it’s important to store wine bottles upright to minimize the surface area exposed to air.
10. Vacuum wine saver
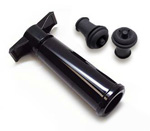
A vacuum wine saver, also known as a vacuum pump wine stopper, is a device designed to extend the shelf life of an opened bottle of wine by removing excess air from the bottle. Oxidation, which occurs when wine is exposed to air, can affect the taste and aroma of the wine. A vacuum wine saver helps slow down this process by creating a vacuum seal that reduces the presence of oxygen inside the bottle. Here’s how a typical vacuum wine saver works:
- Components:
- A vacuum wine saver typically consists of a pump and reusable stoppers.
- The stoppers are often made of rubber or silicone and have a one-way valve that allows air to be pumped out but prevents air from re-entering the bottle.
- Usage:
- After pouring a glass of wine, the user inserts the stopper into the bottle’s neck and ensures a secure fit.
- The vacuum pump is then placed on top of the stopper, and the user pumps the handle to remove the air from the bottle.
- Creating a Seal:
- As the air is pumped out, the stopper creates an airtight seal inside the bottle.
- The reduced air pressure slows down the oxidation process, preserving the wine’s flavors and characteristics.
- Indicator:
- Some vacuum wine savers come with an indicator that shows when the vacuum has been achieved, signaling that the bottle is properly sealed.
- Removal:
- To open the bottle again, the user releases the vacuum seal by pressing a button or pulling a tab on the stopper.
Benefits of using a vacuum wine saver include:
- Extended Freshness: By removing excess air, a vacuum wine saver can extend the freshness of an opened bottle of wine for a longer period compared to simply re-corking the bottle.
- Preservation of Aromas and Flavors: Slowing down oxidation helps preserve the wine’s aromas and flavours, allowing you to enjoy the wine over multiple sittings.
- Versatility: Vacuum wine savers are suitable for use with various types of wine, including red, white, and sparkling wines.
It’s important to note that while a vacuum wine saver can help prolong the life of an opened bottle, it is not a solution for indefinite storage. For the best results, it’s advisable to consume the wine within a reasonable timeframe, even with the use of a vacuum wine saver.
11. Pour Spouts

Pour spouts, also known as bottle pourers or liquor pourers, are devices used in bars and restaurants to control the flow of liquid when pouring beverages from bottles. They are designed to fit into the neck of standard-sized liquor bottles and provide a consistent and controlled stream of liquid, helping bartenders measure and pour accurately. Here are some key features and types of pour spouts:
- Free Pour Spouts:
- These are basic pour spouts without additional measuring mechanisms.
- Bartenders use their experience and judgment to control the pour.
- Measured Pour Spouts:
- Equipped with a built-in measuring mechanism to control the amount of liquid dispensed.
- Common measurements include 1 oz, 1.5 oz, and 2 oz.
- Ideal for maintaining consistency in drink recipes.
- Collared Pour Spouts:
- Have a collar or rubber gasket that fits around the neck of the bottle to create a secure seal.
- The collar helps prevent leakage and ensures a snug fit in various bottle sizes.
- Speed Pourers:
- Designed for quick and efficient pouring, often used in busy bar environments.
- They have a tapered design that allows for a faster flow of liquid.
- Twist and Close Pour Spouts:
- Feature a twist mechanism that can be closed to seal the bottle and prevent evaporation or spills when not in use.
- Flap Pour Spouts:
- Have a hinged flap or cap that opens when the bottle is tilted for pouring and closes when the bottle is upright.
- Provides additional protection against contaminants and evaporation.
- Olive OilSeveral kinds of oil are used to make salad dressing;e.g. olive; peanut; sunflower; walnut; grape se... Pour Spouts:
- Specifically designed for dispensing olive oil or other viscous liquids.
- They often have a narrower spout to control the flow of thicker substances.
- Metal Pour Spouts:
- Made of metal, such as stainless steel, for durability and a sleek appearance.
- Some metal pour spouts have a screen or filter to strain out any impurities.
When choosing pour spouts, considerations include the type of beverages being poured, the desired flow rate, and the level of accuracy needed for drink recipes. Proper cleaning and maintenance of pour spouts are important to prevent clogs and maintain hygiene standards in a bar or restaurant setting. Additionally, some establishments may have specific regulations or preferences regarding the types of pour spouts used.
12. Jigger
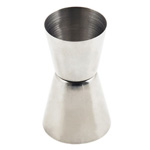
A jigger is a bartending tool used for measuring and pouring precise amounts of liquid ingredients, primarily in cocktail preparation. It typically has two cones or cups of different volumes on either end, allowing bartenders to measure different quantities accurately. Jiggers are an essential tool for maintaining consistency in cocktail recipes. Here are some key features and types of jiggers:
- DoubleA guest room assigned to two people. In beverage operations; a drink prepared with twice the standar... Jigger:
- The most common type of jigger has two cones of different sizes on either end.
- The larger cone is often used for measuring 1.5 ounces (44 milliliters), and the smaller cone for 1 ounce (30 milliliters).
- Japanese Jigger:
- Similar to the double jigger but with a more elongated and slender design.
- Japanese jiggers may have measurement markings on the inside for added precision.
- Ounce-Milliliter Jigger:
- Designed with one cone measuring ounces and the other measuring milliliters.
- Useful for recipes that use both metric and imperial measurements.
- Adjustable Jigger:
- Features an adjustable volume, allowing bartenders to pour various quantities without using different jiggers.
- The volume is typically adjusted by twisting the top or sliding a movable ring.
- Bell Jigger:
- Shaped like a bell or hourglass, with one side larger than the other.
- Some bell jiggers have measurement markings on the inside.
- Hourglass Jigger:
- Resembles an hourglass with two equally-sized cones on either end.
- Bartenders can flip the jigger to measure different volumes.
- Bar Spoon with Jigger End:
- Combines a bar spoon with a jigger at one end, offering dual functionality.
- The jigger end often measures around 1 ounce.
When using a jigger, the bartender fills the desired cone with the liquid ingredient until it reaches the brim. The straight edge at the top of the jigger allows for precise pouring into a mixing glass or shaker.
Jiggers play a crucial role in maintaining consistency and accuracy in cocktail recipes. They are essential tools for both professional bartenders and home cocktail enthusiasts who want to create well-balanced and flavorful drinks.
13. Cocktail Shaker and Glass
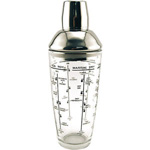
A cocktail shaker is a fundamental tool used in mixing and chilling cocktails by shaking the ingredients together. It typically consists of a metal or glass container with a lid, and there are different types of cocktail shakers available. Additionally, a mixing glass is often used in conjunction with a cocktail shaker for certain cocktails. Here are the key features of both:
Cocktail Shaker:
- Boston Shaker:
- Consists of two parts – a metal tin and a mixing glass.
- The metal tin is typically made of stainless steel, and the mixing glass can be made of glass or plastic.
- To use, the metal tin is placed over the mixing glass, and the two are shaken together to mix and chill the ingredients.
- Cobbler Shaker:
- Comprises three parts – a metal tin, a built-in strainer, and a cap or lid.
- The strainer is typically built into the shaker’s top, allowing for easy pouring without needing an additional strainer.
- Cobbler shakers are more compact and all-in-one compared to Boston shakers.
- Parisian Shaker:
- A hybrid design that combines elements of both the Boston and Cobbler shakers.
- It usually consists of a metal tin and a built-in strainer but lacks a separate mixing glass.
Mixing Glass:
- Standard Mixing Glass:
- Typically made of thick, durable glass.
- Used for stirring cocktails rather than shaking.
- Ideal for cocktails that require gentle mixing and chilling without the aeration produced by shaking.
- Yarai Mixing Glass:
- Features a decorative pattern on the outside for an elegant appearance.
- Often used for stirred cocktails and classic drinks like Martinis.
How to Use:
- Shaking:
- Place the ingredients in the shaker with ice.
- Securely attach the lid and shake vigorously to mix and chill the ingredients.
- Strain the mixture into a glass, using a separate strainer if using a Boston shaker.
- Stirring:
- Place the ingredients in the mixing glass with ice.
- StirStir: Mixing ingredients gently; using a circular motion with a spoon or whisk to ensure even cookin... the ingredients using a bar spoon to mix and chill without introducing air.
- Strain the mixture into a glass using a strainer.
The choice between shaking and stirring often depends on the specific cocktail recipe and the desired characteristics of the drink. Shaking is commonly used for cocktails with citrus or fruit juices, while stirring is preferred for spirit-forward drinks. Both cocktail shakers and mixing glasses are essential tools in a bartender’s or cocktail enthusiast’s arsenal, allowing for the creation of a wide range of delicious and well-balanced drinks.
14. Cocktail Strainer
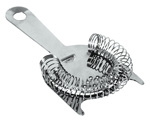
A cocktail strainer is a bar tool designed to separate the liquid components of a cocktail from the ice or other solid ingredients. It helps bartenders or home mixologists pour a well-mixed and chilled drink into a glass while leaving behind any ice, fruit pulp, or other solids that were used during the mixing process. There are a few common types of cocktail strainers:
- Hawthorne Strainer:
- The Hawthorne strainer is the most common type of cocktail strainer.
- It consists of a flat, perforated metal disc with a coiled spring or wire around its edge.
- The spring helps hold the strainer in place over the mouth of the mixing glass or shaker.
- It is particularly useful when pouring from a mixing glass or a Boston shaker.
- Julep Strainer:
- The Julep strainer has a bowl-shaped design with a handle.
- It is ideal for straining stirred cocktails directly from a mixing glass.
- Bartenders often use it for drinks that are prepared by stirring in a mixing glass without shaking.
- Fine Mesh Strainer:
- A fine mesh strainer, often called a double strainer, is used in conjunction with another strainer, usually the Hawthorne strainer.
- It has a fine mesh basket that catches smaller particles, ensuring an extra level of filtration for a smoother cocktail.
How to Use a Cocktail Strainer:
- Hawthorne Strainer:
- Place the Hawthorne strainer over the opening of the mixing glass or shaker.
- Hold it securely with one hand while using the other hand to pour the liquid into the serving glass.
- Julep Strainer:
- After stirring a cocktail in a mixing glass, place the Julep strainer inside the mixing glass.
- Hold the strainer in place with your finger and strain the liquid into the serving glass using the Julep strainer.
- Fine Mesh Strainer:
- When using a fine mesh strainer, hold it over the serving glass in addition to the primary strainer (e.g., Hawthorne strainer).
- Pour the liquid through both strainers to ensure a smoother, debris-free cocktail.
Cocktail strainers are crucial tools for achieving the desired texture and clarity in cocktails. They help deliver a clean and well-strained drink, enhancing the overall drinking experience. The choice of strainer often depends on the mixing method (shaking or stirring) and personal preference.
15. BAR Juice Container
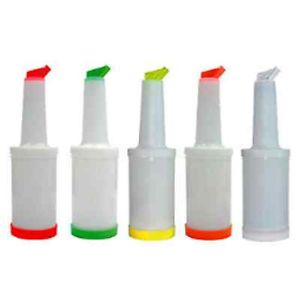
Colour-coded juice containers in a bar setting can be a practical and efficient way to organize different types of juices and prevent cross-contamination. Using distinct colors for various juices helps bartenders quickly identify and access the right ingredients during the busy pace of a bar. Here’s a general guide for color-coding juice containers, although practices may vary:
Keep fruit juice sorted by different colors, easy for storage, clarify different juice by bottle color, and convenience while preparing drinks at BAR.
- Black & Red = Cranberry
- Green = Apple
- Orange = Orange
- Yellow = Pineapple
- Red = Grapefruit
- White = Milk
- Red & Red = Tomato Juice
The container also plays a role in maintaining the freshness of the juice, especially if it’s being stored for an extended period. Always ensure that the chosen container is easy to clean and maintain for hygiene purposes.
- Orange Juice: Orange is a common color for orange juice containers. The vibrant color makes it easily distinguishable.
- Cranberry Juice: Red is often used to represent cranberry juice. This color helps differentiate it from other juices.
- Grapefruit Juice: Pink or a light red hue is commonly associated with grapefruit juice. It helps prevent confusion with other red juices like cranberry.
- Lemon Juice: Yellow is frequently used for lemon juice. It aligns with the color of fresh lemons and is easily recognizable.
- Lime Juice: Green is a logical choice for lime juice, as it corresponds to the color of fresh limes.
- Pineapple Juice: Yellow or gold is often used for pineapple juice containers, reflecting the color of ripe pineapples.
- Tomato Juice: If your bar serves Bloody Marys or other tomato-based cocktails, consider using a distinct color like red or a deeper hue to represent tomato juice.
- Multi-use or Simple Syrup: Clear or white containers are often used for simple syrup or other neutral mixers that don’t have a specific color associated with them.
It’s important to establish a consistent color-coding system within your bar and ensure that all staff members are aware of it. This helps streamline the workflow, reduces the risk of errors, and maintains a clean and organized workspace. Additionally, using containers with labels or tags specifying the juice type can further enhance clarity, especially for new staff members or during hectic periods.
Keep in mind that color preferences and practices may vary across different bars, so it’s essential to establish a system that works best for your specific bar setup and team. Regularly cleaning and maintaining the containers is also crucial to uphold hygiene standards.
16. Steel Ice Bucket
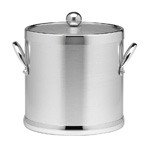
A steel ice bucket is a stylish and functional accessory commonly used in bars, restaurants, and homes for chilling and serving ice. Steel, particularly stainless steel, is a popular material for ice buckets due to its durability, resistance to corrosion, and sleek aesthetic. Here are some key features and considerations for a steel ice bucket:
- Material:
- Stainless Steel: Most steel ice buckets are made of stainless steel. This material is corrosion-resistant, durable, and easy to clean. It also provides a modern and polished appearance.
- Design:
- Single-Wall or Double-Wall: Ice buckets can be single-wall or double-wall. Double-wall construction adds insulation, helping to keep the ice frozen for a more extended period without exterior condensation.
- Handles: Some steel ice buckets come with handles for easy carrying, while others may have side handles or a bail handle for convenient transportation.
- Lid: Some ice buckets come with a lid to help retain cold temperatures and prevent contaminants from entering. Lids can be hinged or removable.
- Tongs or Scoop Holder: Certain ice buckets have a built-in holder for ice tongs or scoops, providing a designated spot for these tools.
- DecorationThe Decoration department is responsible for decorating the place on various occasions; on special d...: Steel ice buckets often feature stylish and decorative elements, such as brushed or polished finishes, embossed logos, or engraved designs.
- Size:
- Ice buckets come in various sizes to accommodate different volumes of ice. Consider the intended use and the space available when selecting the size.
- Insulation:
- Double-wall construction provides insulation to keep the ice colder for a more extended period. This is particularly useful in settings where the ice bucket is placed on a tabletop for an extended time.
- Cleaning and Maintenance:
- Stainless steel is easy to clean, typically requiring only a gentle wipe with a damp cloth. Some steel ice buckets are dishwasher-safe for added convenience.
- Versatility:
- Steel ice buckets are versatile and can be used for various occasions, from casual gatherings to formal events. They complement different table settings and bar aesthetics.
- Brand and Quality:
- Consider reputable brands known for their quality when choosing a steel ice bucket. Well-constructed ice buckets can provide long-lasting durability and performance.
Steel ice buckets are not only functional for keeping ice cold but also add an element of sophistication to the serving experience. Whether used in a bar, restaurant, or at home, a steel ice bucket is a versatile and timeless accessory for chilling and serving ice.
17. Ice Scoop
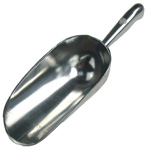
An ice scoop is a utensil designed for scooping and serving ice. It is a practical tool commonly used in bars, restaurants, and other food and beverage establishments, as well as at home. Ice scoops are available in various materials, sizes, and designs to suit different needs. Here are some key features and considerations for ice scoops:
- Material:
- Stainless Steel: Stainless steel ice scoops are popular due to their durability, resistance to corrosion, and ease of cleaning. They are suitable for both commercial and home use.
- Plastic: Plastic ice scoops are lightweight and often used in settings where a more economical option is preferred. They are available in various colors and can be dishwasher-safe.
- Aluminum: Aluminum ice scoops are lightweight and corrosion-resistant. They are commonly used in commercial kitchens and bars.
- Polycarbonate: Polycarbonate ice scoops offer durability and transparency, allowing users to see the amount of ice being scooped. They are often used in settings where a clear scoop is preferred.
- Size:
- Ice scoops come in various sizes to accommodate different ice needs. Consider the size of your ice bin or container when choosing a scoop to ensure it fits comfortably and allows for efficient scooping.
- Design:
- FlatA flat silver plated or stainless steel tray used for service. Bottom Scoop: Some ice scoops have a flat bottom, allowing them to sit on a countertop without tipping over. This design is convenient for self-service ice stations.
- Tapered Design: Tapered ice scoops have a narrower bottom and wider top, making them suitable for efficiently scooping and pouring ice into glasses.
- Perforated Scoop: Some scoops have perforations or slots to drain excess water, ensuring that only the ice is transferred to the serving area.
- Handle:
- Ice scoops typically have a handle for comfortable gripping. Consider the length and design of the handle, as well as whether it is comfortable for your hand.
- Hygiene:
- Look for ice scoops with features that promote hygiene, such as smooth edges and easy-to-clean surfaces. Some models have built-in guards or shields to protect the ice from hand contact.
- Capacity:
- Consider the capacity of the ice scoop, which is the amount of ice it can hold in a single scoop. This depends on the size and shape of the scoop.
- SafetySafety is a condition in which persons are safe from injury; hurt; or loss while present in the work... and Compliance:
- Ensure that the ice scoop complies with relevant safety and hygiene regulations, especially in commercial settings.
Ice scoops are essential tools for maintaining hygiene and efficiency when serving ice. Whether used in a bar, restaurant, or at home, choosing the right ice scoop involves considering factors such as material, size, design, and hygiene features to meet your specific needs.
18. Ice Shot Glass Mold
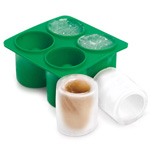
An ice shot glass mold is a fun and creative way to make shot glasses entirely out of ice. These molds are designed to create glasses made of ice, which can be filled with your favorite beverages, such as cocktails or shots. Here are some key features and considerations for ice shot glass molds:
- Material:
- Ice shot glass molds are typically made of silicone or plastic. Silicone molds are flexible, making it easier to remove the ice glasses, while plastic molds are rigid and may be stackable.
- Design:
- The molds are designed to resemble shot glasses, often with a cylindrical shape and an indentation at the top to mimic the opening of a traditional shot glass.
- Size and Capacity:
- Consider the size and capacity of the ice shot glass mold. This will determine the volume of liquid the shot glasses can hold once frozen.
- Number of Cavities:
- Ice shot glass molds come with multiple cavities, allowing you to make several ice shot glasses at once. Common mold sizes may have 4, 6, or more cavities.
- Easy Release:
- Look for molds with features that make it easy to release the ice shot glasses without cracking or breaking them. Silicone molds are known for their flexibility, which aids in easy release.
- Versatility:
- Some ice shot glass molds may have additional features, such as the ability to add flavorings or decorations to the ice glasses. Check if the mold has any unique features that enhance the overall experience.
- Dishwasher-Safe:
- Check if the ice shot glass mold is dishwasher-safe for convenient and easy cleaning.
- Freezer Compatibility:
- Ensure that the mold is suitable for use in the freezer. Most molds are designed to withstand freezing temperatures without any issues.
How to Use Ice Shot Glass Molds:
- Prepare the Mold:
- Clean the mold thoroughly before use.
- Place the mold on a flat surface, making it easier to transfer to the freezer.
- Fill the Mold:
- Fill each cavity of the mold with water or your desired liquid.
- Leave some space at the top to allow for expansion as the water freezes.
- Freeze:
- Place the mold in the freezer and let the water freeze completely. This may take a few hours.
- Remove from the Mold:
- Once the ice is fully frozen, carefully remove the shot glasses from the mold.
- If using a silicone mold, flex the mold to release the ice glasses easily.
- Serve:
- Fill the ice shot glasses with your preferred beverage and serve immediately.
Ice-shot glass molds are a creative and entertaining addition to parties, gatherings, and events, adding a unique touch to your drink presentation. They can be used for both alcoholic and non-alcoholic beverages, and their novelty makes them a popular choice for various occasions.
19. Muddler
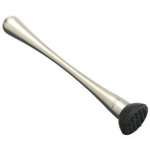
A muddler is a bartending tool used for muddling or mashing ingredients in the bottom of a glass or shaker. This process helps release the flavors and aromas of herbs, fruits, and other ingredients, contributing to the overall taste of a cocktail. Muddlers come in various materials and designs, but they generally have a sturdy construction suitable for crushing ingredients without damaging the glassware. Here are some key features and considerations for muddlers:
- Material:
- Wood: Wooden muddlers are a traditional choice. They are often made from hardwood, such as beechwood or maple. Wood muddlers are known for their natural and classic appearance.
- Stainless Steel: Stainless steel muddlers are durable and easy to clean. They often have a smooth and sleek design.
- Plastic: Plastic muddlers are lightweight and less likely to scratch glassware. They are a cost-effective option and may be suitable for beginner home bartenders.
- Composite Materials: Some muddlers are made from a combination of materials, such as a wooden handle with a stainless steel muddling head.
- Design:
- Flat or Angled Head: Muddlers typically have a flat or angled muddling head. The choice may depend on personal preference and the types of ingredients being muddled.
- Teeth or Spikes: Some muddlers have teeth or spikes on the muddling head to help crush ingredients more effectively. This design is particularly useful for muddling herbs and fruits.
- Long Handle: A long handle provides better leverage when muddling ingredients in a shaker or glass.
- Size:
- Muddlers come in various sizes. Choose a size that feels comfortable in your hand and suits the size of the glass or shaker you typically use.
- Easy to Clean:
- Consider how easy the muddler is to clean. Smooth surfaces without crevices can be more convenient to wash and maintain.
- Versatility:
- Some muddlers may have additional features, such as a stirring or mixing function on the opposite end. This can make the muddler more versatile for various cocktail preparations.
How to Use a Muddler:
- Place Ingredients in the Glass or Shaker:
- Add the ingredients you want to muddle to the bottom of the glass or shaker. This often includes herbs, fruits, or sugar.
- Hold the Muddler:
- Grasp the muddler near the handle to provide leverage during the muddling process.
- Muddle Gently:
- Press down and twist the muddler to gently crush the ingredients. Avoid excessive force to prevent over-muddling or breaking delicate ingredients.
- Rotate or Move the Muddler:
- Rotate or move the muddler around to ensure even muddling of the ingredients.
- Finish Muddling:
- Continue until the desired flavors and aromas are extracted from the ingredients.
- Proceed with Cocktail Preparation:
- If you’re making a cocktail, proceed with the remaining steps, such as adding liquids, ice, and other ingredients.
Muddlers are essential tools for creating a variety of cocktails, especially those that involve fresh herbs, fruits, or sugar. Choosing the right muddler depends on personal preference, the types of cocktails you enjoy making, and the materials that suit your needs.
20. Bar Spoon

A bar spoon is a specialized stirring tool used in bartending to mix and layer ingredients in cocktails. It typically features a long, slender handle and a twisted shaft or a spoon at one end. Bar spoons are designed for precision and control, allowing bartenders to stir drinks gently and efficiently. Here are some key features and considerations for bar spoons:
- Length:
- Bar spoons are longer than regular spoons, usually ranging from around 10 to 16 inches (25 to 40 centimeters). The length allows bartenders to reach the bottom of tall mixing glasses or shakers with ease.
- Handle:
- The handle of a bar spoon is often twisted or spiral-shaped, providing a comfortable grip and facilitating a steady rotation while stirring. This design allows for more control during the stirring process.
- Twisted Shaft:
- Many bar spoons have a twisted shaft that runs along the handle. This twisted feature serves both a functional and aesthetic purpose. It aids in the stirring motion and adds a stylish element to the tool.
- Spoon or Disk at the End:
- The other end of the bar spoon typically features a spoon or disk. This allows for efficient stirring and layering of ingredients, especially in tall glasses or mixing containers.
- Weight and BalanceBalance is the amount of an account at a point in time.:
- Bar spoons are designed to have a balanced weight distribution to facilitate precise and controlled stirring. The weight helps the spoon move smoothly through the ingredients.
- Materials:
- Bar spoons are commonly made of stainless steel due to its durability, resistance to corrosion, and ease of cleaning. Some high-quality bar spoons may have plated or gold accents for a more stylish appearance.
- Doubles as a Measurement Tool:
- Some bar spoons have a specific volume marking on the twisted handle, allowing them to serve as a built-in measurement tool. This is particularly useful when creating layered cocktails.
- Flat End for Layering:
- Some bar spoons have a flat disk at the end instead of a spoon. This flat end is useful for carefully layering ingredients, such as pouring one liquid over the back of the spoon to float it on top of another.
How to Use a Bar Spoon:
- Hold the Spoon:
- Grip the twisted or spiral handle near the top for a comfortable hold.
- Insert into the Glass:
- Insert the spoon into the mixing glass or shaker, reaching the bottom.
- Stir Gently:
- Use a gentle and controlled stirring motion, rotating the spoon in a circular or back-and-forth pattern. The twisted shaft aids in a smooth rotation.
- Layering:
- For layering cocktails, use the flat end or spoon at the opposite end of the handle to pour liquids gently over the back of the spoon.
Bar spoons are essential tools for bartenders who want to create well-mixed and balanced cocktails. The length, twisted design, and other features of the bar spoon contribute to its functionality and make it a versatile tool in the craft of cocktail preparation.
21. Chopping Board, Paring Knife and Channel Knife
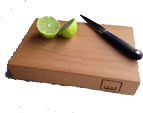
While chopping boards, paring knives, and channel knives are commonly associated with kitchen use, they can also have specific applications in a bar setting. Here’s how each of these tools might be utilized in a bar environment:
- Chopping Board:
- Function in a Bar: Chopping boards in a bar setting are essential for various tasks, such as cutting garnishes, slicing fruit, or preparing ingredients for cocktails.
- Material: Bar chopping boards are often made of food-safe plastic or wood. Plastic boards are easy to clean and sanitize, while wooden boards may impart a natural aesthetic to the bar.
- Use Case: A bartender might use a chopping board to cut fresh fruit, herbs, or other garnishes for cocktails. It provides a dedicated surface for food preparation, maintaining cleanliness and hygiene in the bar area.
- Paring Knife:
- Function in a Bar: Paring knives are versatile small knives with a pointed tip, ideal for intricate tasks like peeling, trimming, and slicing small fruits or garnishes.
- Blade: Paring knives typically have a short, narrow blade, allowing for precise control.
- Use Case: A bartender may use a paring knife to peel citrus fruits, trim garnishes, or make decorative cuts for cocktail presentations. The small size and pointed tip make it suitable for detailed and delicate work.
- Channel Knife:
- Function in a Bar: A channel knife is a specialized tool with a V-shaped blade designed for creating decorative citrus peels or twists. It produces a long, spiral-shaped peel.
- Blade Design: The blade of a channel knife has a hollowed-out section that creates the desired channel or groove in the citrus peel.
- Use Case: Bartenders use a channel knife to create visually appealing citrus garnishes, adding a touch of elegance to cocktails. The resulting twists or curls can be used to adorn the rim of glasses or float on the surface of drinks.
When using these tools in a bar, hygiene is crucial. Regular cleaning and sanitization of chopping boards and knives help ensure the safety of the food and beverages served. Additionally, proper storage of knives, such as using magnetic strips or knife racks, enhances safety and accessibility.
While the primary focus of a bar is on beverage preparation, the use of kitchen tools like chopping boards, paring knives, and channel knives contributes to the craft of mixology by allowing bartenders to create visually appealing and well-prepared garnishes for cocktails.
22. Margarita Tray
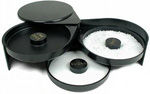
A margarita tray is the perfect accessory to any summer gathering or party. This tray usually includes all the necessary items to make and serve margaritas, such as a pitcher for the margarita mix, glasses with salt rims, and a citrus juicer for fresh lime juice. Some margarita trays also come with a cocktail shaker and a strainer for those who prefer their margaritas shaken instead of blended.
- Cocktail Presentation Tray:
- A tray designed to hold and display multiple Margarita glasses filled with cocktails. It could also have compartments for additional items like lime wedges, salt rimmers, or garnishes.
- Themed Serving Platter:
- A decorative serving platter with Margarita-themed illustrations, colors, or patterns. This type of tray adds a festive touch to the presentation of Margarita drinks at parties or events.
- Portable Margarita Station:
- A tray with designated spaces for holding Margarita ingredients, such as a bottle of tequila, triple sec, lime wedges, and salt. This type of tray allows for a portable and organized setup for making Margaritas on the go.
- Customizable GarnishGarnish - The artistic complementing of a food item with other food or edible item. Tray:
- A tray designed to hold various garnishes commonly used in Margaritas, such as salt, lime slices, and other fruit slices. Bartenders can easily access these garnishes to enhance the presentation of Margarita orders.
When using a Margarita tray, the goal is typically to streamline the process of serving Margaritas, enhance the presentation, and ensure that all necessary components are easily accessible. The design and features would depend on the specific needs of the establishment or event.
In a home setting, a Margarita tray could be a creative and practical addition to a bar cart or entertaining area. It allows for an organized and visually appealing presentation when serving Margaritas to guests.
If you have a specific context or use case in mind, providing more details could help in giving more tailored information about what a Margarita tray might entail.